项目实践·Docker FastDFS
Docker FastDFS
FastDFS 文件服务器
FastDFS 是一个开源的轻量级分布式文件系统,它对文件进行管理,功能包括:文件存储、文件同步、文件访问(文件上传、文件下载)等,解决了大容量存储和负载均衡的问题。
FastDFS 为互联网量身定制,充分考虑了冗余备份、负载均衡、线性扩容等机制,并注重高可用、高性能等指标,使用 FastDFS 很容易搭建一套高性能的文件服务器集群提供文件上传、下载等服务。
FastDFS 服务端有两个角色:跟踪器(tracker)和存储节点(storage)。跟踪器主要做调度工作,在访问上起负载均衡的作用。
存储节点存储文件,完成文件管理的所有功能:就是这样的存储、同步和提供存取接口,FastDFS 同时对文件的 metadata 进行管理。所谓文件的 meta data 就是文件的相关属性,以键值对(key valuepair)方式表示,如:width=1024,其中的 key 为 width,value 为 1024。文件 metadata 是文件属性列表,可以包含多个键值对。
跟踪器和存储节点都可以由一台或多台服务器构成。跟踪器和存储节点中的服务器均可以随时增加或下线而不会影响线上服务。其中跟踪器中的所有服务器都是对等的,可以根据服务器的压力情况随时增加或减少。
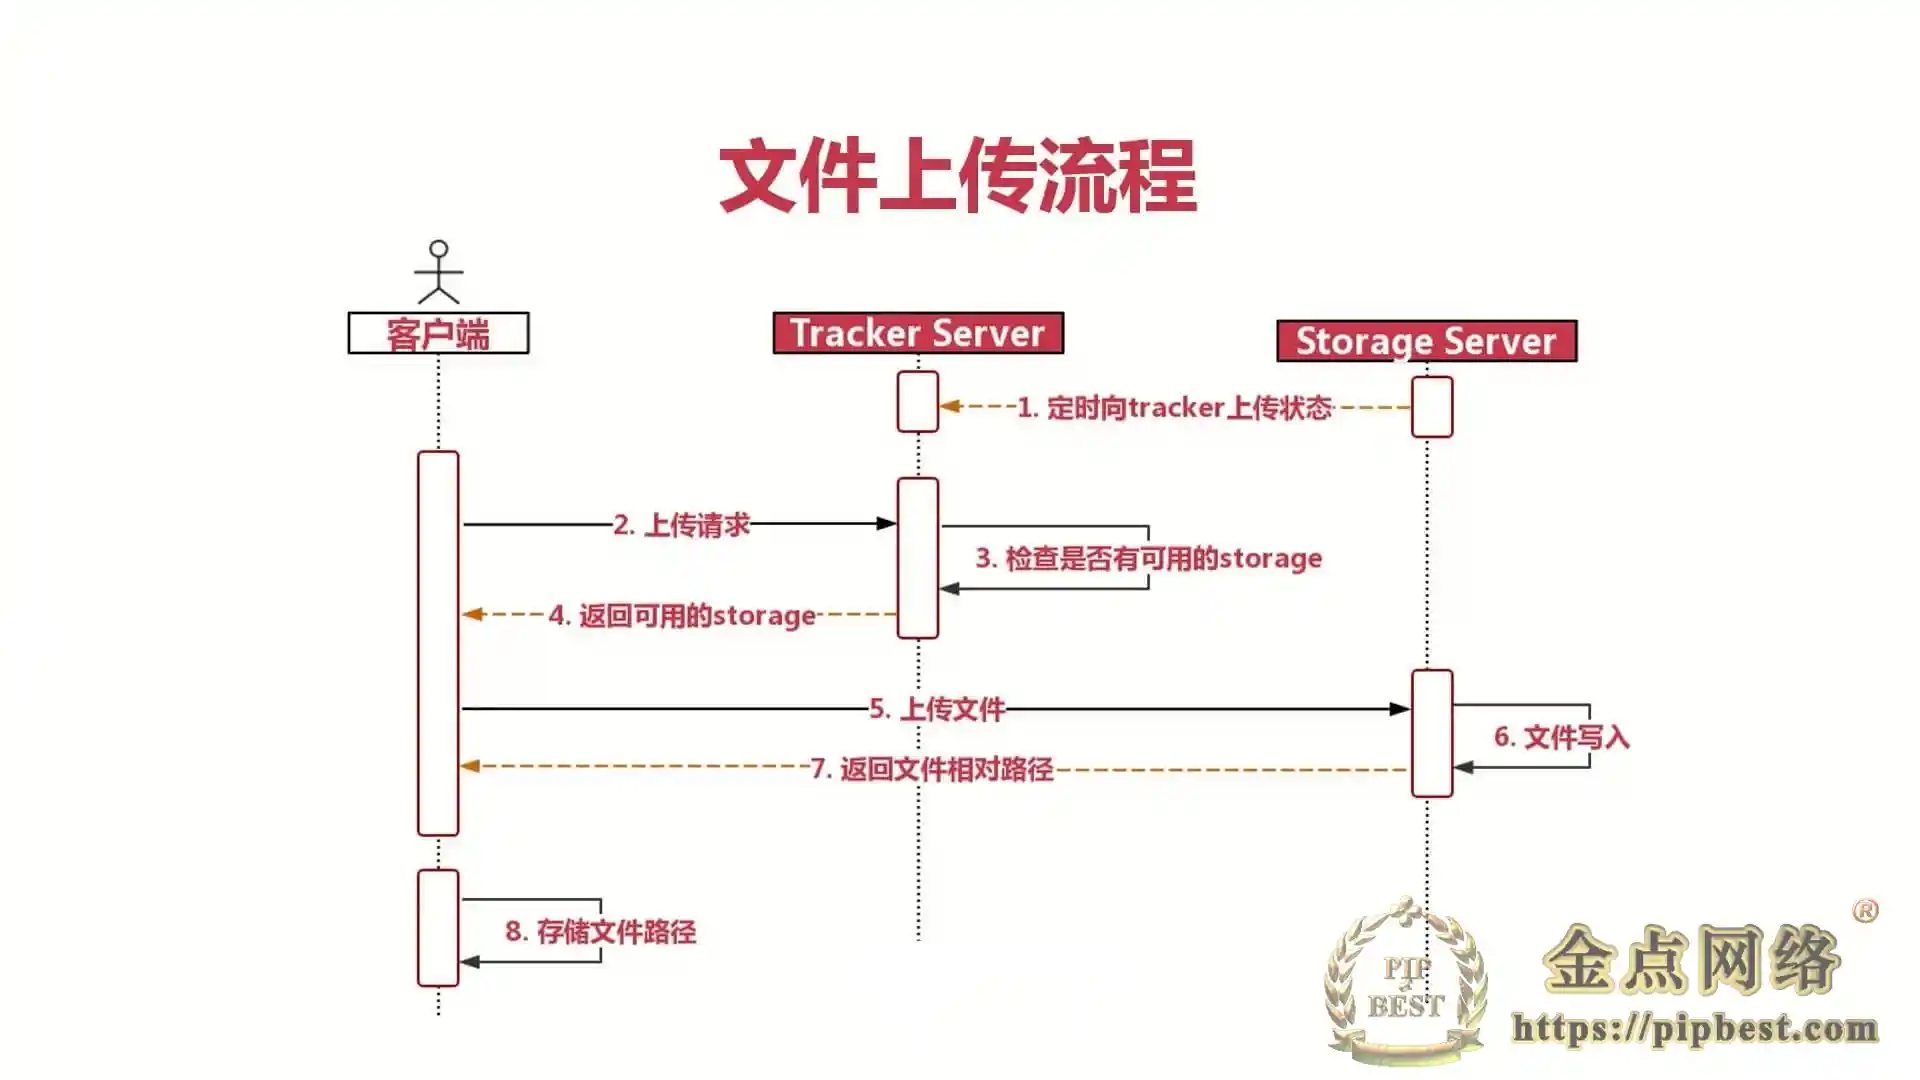
上传交互过程
- client 询问 tracker 上传到的 storage,不需要附加参数
- tracker 返回一台可用的 storage
- client 直接和 storage 通讯完成文件上传
下载交互过程
- client 询问 tracker 下载文件的 storage,参数为文件标识(卷名和文件名)
- tracker 返回一台可用的 storage
- client 直接和 storage 通讯完成文件下载
准备依赖
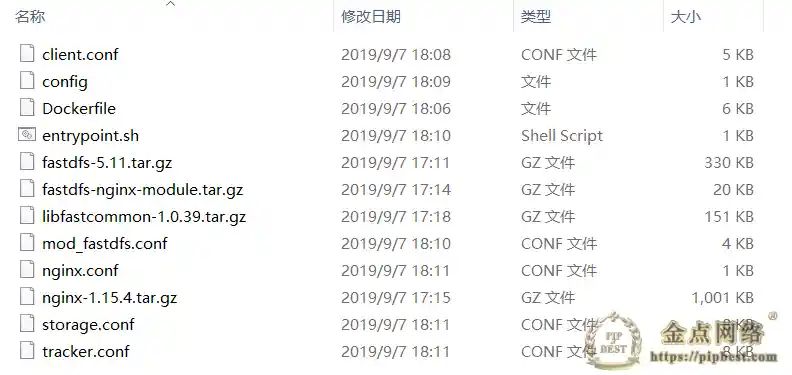
首先下载依赖包:
- fastdfs-5.11.tar.gz
- fastdfs-nginx-module.tar.gz
- libfastcommon-1.0.39.tar.gz
- nginx-1.15.4.tar.gz
需要注意:fastdfs-nginx-module.tar.gz
这个包从 github release 下载下来会多压缩一层目录,先解压处理后再压缩。
配置文件
docker-compose.yml
version: '3.1'
services:
fastdfs:
build: environment
restart: always
container_name: Nicestar-fastdfs
volumes:
- ./storage:/fastdfs/storage
network_mode: host
Dockerfile
FROM ubuntu:xenial
MAINTAINER me@pipbest.com
# 更新数据源
WORKDIR /etc/apt
RUN echo 'deb http://mirrors.aliyun.com/ubuntu/ xenial main restricted universe multiverse' > sources.list
RUN echo 'deb http://mirrors.aliyun.com/ubuntu/ xenial-security main restricted universe multiverse' >> sources.list
RUN echo 'deb http://mirrors.aliyun.com/ubuntu/ xenial-updates main restricted universe multiverse' >> sources.list
RUN echo 'deb http://mirrors.aliyun.com/ubuntu/ xenial-backports main restricted universe multiverse' >> sources.list
RUN apt-get update
# 安装依赖
RUN apt-get install make gcc libpcre3-dev zlib1g-dev --assume-yes
# 复制工具包
ADD fastdfs-5.11.tar.gz /usr/local/src
ADD fastdfs-nginx-module.tar.gz /usr/local/src
ADD libfastcommon-1.0.39.tar.gz /usr/local/src
ADD nginx-1.15.4.tar.gz /usr/local/src
# 安装 libfastcommon
WORKDIR /usr/local/src/libfastcommon-1.0.39
RUN ./make.sh && ./make.sh install
# 安装 FastDFS
WORKDIR /usr/local/src/fastdfs-5.11
RUN ./make.sh && ./make.sh install
# 配置 FastDFS 跟踪器
ADD tracker.conf /etc/fdfs
RUN mkdir -p /fastdfs/tracker
# 配置 FastDFS 存储
ADD storage.conf /etc/fdfs
RUN mkdir -p /fastdfs/storage
# 配置 FastDFS 客户端
ADD client.conf /etc/fdfs
# 配置 fastdfs-nginx-module
ADD config /usr/local/src/fastdfs-nginx-module/src
# FastDFS 与 Nginx 集成
WORKDIR /usr/local/src/nginx-1.15.4
RUN ./configure --add-module=/usr/local/src/fastdfs-nginx-module/src
RUN make && make install
ADD mod_fastdfs.conf /etc/fdfs
WORKDIR /usr/local/src/fastdfs-5.11/conf
RUN cp http.conf mime.types /etc/fdfs/
# 配置 Nginx
ADD nginx.conf /usr/local/nginx/conf
COPY entrypoint.sh /usr/local/bin/
ENTRYPOINT ["/usr/local/bin/entrypoint.sh"]
WORKDIR /
EXPOSE 8888
CMD ["/bin/bash"]
entrypoint.sh
Shell 创建后是无法直接使用的,需要赋予执行的权限,使用 chmod +x entrypoint.sh
命令。
#!/bin/sh
/etc/init.d/fdfs_trackerd start
/etc/init.d/fdfs_storaged start
/usr/local/nginx/sbin/nginx -g 'daemon off;'
tracker.conf
FastDFS 跟踪器配置,容器中路径为:/etc/fdfs,修改为:
base_path=/fastdfs/tracker
storage.conf
FastDFS 存储配置,容器中路径为:/etc/fdfs,修改为:
base_path=/fastdfs/storage
store_path0=/fastdfs/storage
tracker_server=192.168.205.10:22122
http.server_port=8888
client.conf
FastDFS 客户端配置,容器中路径为:/etc/fdfs,修改为:
base_path=/fastdfs/tracker
tracker_server=192.168.205.10:22122
config
fastdfs-nginx-module 配置文件,容器中路径为:/usr/local/src/fastdfs-nginx-module/src,修改为:
CORE_INCS="$CORE_INCS /usr/include/fastdfs /usr/include/fastcommon/"
CORE_LIBS="$CORE_LIBS -L/usr/lib -lfastcommon -lfdfsclient"
mod_fastdfs.conf
fastdfs-nginx-module 配置文件,容器中路径为:/usr/local/src/fastdfs-nginx-module/src,修改为:
connect_timeout=10
tracker_server=192.168.205.10:22122
url_have_group_name = true
store_path0=/fastdfs/storage
nginx.conf
Nginx 配置文件,容器中路径为:/usr/local/src/nginx-1.13.6/conf,修改为:
user root;
worker_processes 1;
events {
worker_connections 1024;
}
http {
include mime.types;
default_type application/octet-stream;
sendfile on;
keepalive_timeout 65;
server {
listen 8888;
server_name localhost;
location ~/group([0-9])/M00 {
ngx_fastdfs_module;
}
error_page 500 502 503 504 /50x.html;
location = /50x.html {
root html;
}
}
}
启动测试
# 启动容器
docker-compose up -d
# 进入容器
docker exec -it fastdfs /bin/bash
# 上传文件
/usr/bin/fdfs_upload_file /etc/fdfs/client.conf /usr/local/src/fastdfs-5.11/INSTALL
上传成功返回文件路径 group1/M00/00/00/wKjNCl1zlSCAF-5lAAAeS70IE2U2766292
,加上主机 ip 即可访问 http://192.168.205.10:8888/group1/M00/00/00/wKjNCl1zlSCAF-5lAAAeS70IE2U2766292
。
整合 spring boot
添加依赖
<dependency>
<groupId>com.github.tobato</groupId>
<artifactId>fastdfs-client</artifactId>
<version>1.26.2</version>
</dependency>
配置文件
fdfs:
so-timeout: 1501
connect-timeout: 601
thumb-image:
width: 150
height: 150
tracker-list:
- 192.168.205.10:22122
FastDFS-Client
导入 FastDFS-Client 项目地址 组件:
@Configuration
@Import(FdfsClientConfig.class)
@EnableMBeanExport(registration = RegistrationPolicy.IGNORE_EXISTING)
public class FastdfsImport {}
FastDFSClient 和 FileUtils
最后添加两个工具类文件,方便文件上传:
@Component
public class FastDFSClient {
@Autowired
private FastFileStorageClient storageClient;
/**
* 上传文件
* @param file 文件对象
* @return 文件访问地址
* @throws IOException
*/
public String uploadFile(MultipartFile file) throws IOException {
StorePath storePath = storageClient.uploadFile(file.getInputStream(), file.getSize(),
FilenameUtils.getExtension(file.getOriginalFilename()), null);
return storePath.getPath();
}
public String uploadFile2(MultipartFile file) throws IOException {
StorePath storePath = storageClient.uploadImageAndCrtThumbImage(file.getInputStream(), file.getSize(),
FilenameUtils.getExtension(file.getOriginalFilename()), null);
return storePath.getPath();
}
public String uploadQRCode(MultipartFile file) throws IOException {
StorePath storePath = storageClient.uploadFile(file.getInputStream(), file.getSize(),
"png", null);
return storePath.getPath();
}
public String uploadFace(MultipartFile file) throws IOException {
StorePath storePath = storageClient.uploadImageAndCrtThumbImage(file.getInputStream(), file.getSize(),
"png", null);
return storePath.getPath();
}
public String uploadBase64(MultipartFile file) throws IOException {
StorePath storePath = storageClient.uploadImageAndCrtThumbImage(file.getInputStream(), file.getSize(),
"png", null);
return storePath.getPath();
}
/**
* 将一段字符串生成一个文件上传
* @param content 文件内容
* @param fileExtension
* @return
*/
public String uploadFile(String content, String fileExtension) {
byte[] buff = content.getBytes(Charset.forName("UTF-8"));
ByteArrayInputStream stream = new ByteArrayInputStream(buff);
StorePath storePath = storageClient.uploadFile(stream, buff.length, fileExtension, null);
return storePath.getPath();
}
/**
* 删除文件
* @param fileUrl 文件访问地址
* @return
*/
public void deleteFile(String fileUrl) {
if (StringUtils.isEmpty(fileUrl)) {
return;
}
try {
StorePath storePath = StorePath.praseFromUrl(fileUrl);
storageClient.deleteFile(storePath.getGroup(), storePath.getPath());
} catch (FdfsUnsupportStorePathException e) {
e.getMessage();
}
}
}
@Service
public class FileUtils {
/**
* 根据url拿取file
* @param url
* @param suffix 文件后缀名
*/
public static File createFileByUrl(String url, String suffix) {
byte[] byteFile = getImageFromNetByUrl(url);
if (byteFile != null) {
File file = getFileFromBytes(byteFile, suffix);
return file;
} else {
return null;
}
}
/**
* 根据地址获得数据的字节流
* @param strUrl 网络连接地址
* @return
*/
private static byte[] getImageFromNetByUrl(String strUrl) {
try {
URL url = new URL(strUrl);
HttpURLConnection conn = (HttpURLConnection) url.openConnection();
conn.setRequestMethod("GET");
conn.setConnectTimeout(5 * 1000);
InputStream inStream = conn.getInputStream();// 通过输入流获取图片数据
byte[] btImg = readInputStream(inStream);// 得到图片的二进制数据
return btImg;
} catch (Exception e) {
e.printStackTrace();
}
return null;
}
/**
* 从输入流中获取数据
* @param inStream 输入流
* @return
* @throws Exception
*/
private static byte[] readInputStream(InputStream inStream) throws Exception {
ByteArrayOutputStream outStream = new ByteArrayOutputStream();
byte[] buffer = new byte[1024];
int len = 0;
while ((len = inStream.read(buffer)) != -1) {
outStream.write(buffer, 0, len);
}
inStream.close();
return outStream.toByteArray();
}
// 创建临时文件
private static File getFileFromBytes(byte[] b, String suffix) {
BufferedOutputStream stream = null;
File file = null;
try {
file = File.createTempFile("pattern", "." + suffix);
System.out.println("临时文件位置:" + file.getCanonicalPath());
FileOutputStream fstream = new FileOutputStream(file);
stream = new BufferedOutputStream(fstream);
stream.write(b);
} catch (Exception e) {
e.printStackTrace();
} finally {
if (stream != null) {
try {
stream.close();
} catch (IOException e) {
e.printStackTrace();
}
}
}
return file;
}
public static MultipartFile createImg(String url) {
try {
// File转换成MutipartFile
File file = FileUtils.createFileByUrl(url, "jpg");
FileInputStream inputStream = new FileInputStream(file);
MultipartFile multipartFile = new MockMultipartFile(file.getName(), inputStream);
return multipartFile;
} catch (IOException e) {
e.printStackTrace();
return null;
}
}
public static MultipartFile fileToMultipart(String filePath) {
try {
// File转换成MutipartFile
File file = new File(filePath);
FileInputStream inputStream = new FileInputStream(file);
MultipartFile multipartFile = new MockMultipartFile(file.getName(), "png", "image/png", inputStream);
return multipartFile;
} catch (IOException e) {
// TODO Auto-generated catch block
e.printStackTrace();
return null;
}
}
public static boolean base64ToFile(String filePath, String base64Data) throws Exception {
String dataPrix = "";
String data = "";
if(base64Data == null || "".equals(base64Data)){
return false;
}else{
String [] d = base64Data.split("base64,");
if(d != null && d.length == 2){
dataPrix = d[0];
data = d[1];
}else{
return false;
}
}
// 因为BASE64Decoder的jar问题,此处使用spring框架提供的工具包
byte[] bs = Base64Utils.decodeFromString(data);
// 使用apache提供的工具类操作流
org.apache.commons.io.FileUtils.writeByteArrayToFile(new File(filePath), bs);
return true;
}
}
上传示例
文件上传示例:
@RestController
@RequestMapping("/tool")
@RequiredArgsConstructor(onConstructor = @__(@Autowired))
@Slf4j
public class ToolController {
private final FastDFSClient fastDFSClient;
private final String AVATARHOST = "http://192.168.205.10:8888/group1/";
@PostMapping("/upload")
public CommJSONResult<String> upload(@RequestParam("file") MultipartFile file) throws Exception {
if (file.isEmpty()) {
return CommJSONResult.errorMsg(ApiStatusEnums.FILE_NOT_EMPTY.getMsg());
}
String url = fastDFSClient.uploadBase64(file);
String avatar = AVATARHOST + url;
return CommJSONResult.ok(avatar);
}
}
参考文章:
fastdfs wiki
基于 Docker 安装 FastDFS
金点网络-全网资源,一网打尽 » 项目实践·Docker FastDFS
常见问题FAQ
- 免费下载或者VIP会员专享资源能否直接商用?
- 本站所有资源版权均属于原作者所有,这里所提供资源均只能用于参考学习用,请勿直接商用。若由于商用引起版权纠纷,一切责任均由使用者承担。
- 是否提供免费更新服务?
- 持续更新,永久免费
- 是否经过安全检测?
- 安全无毒,放心食用