项目实践·微信点餐系统

作者 : jamin 本文共8144个字,预计阅读时间需要21分钟 发布时间: 2020-10-18 共1112人阅读

微信点餐系统

项目设计

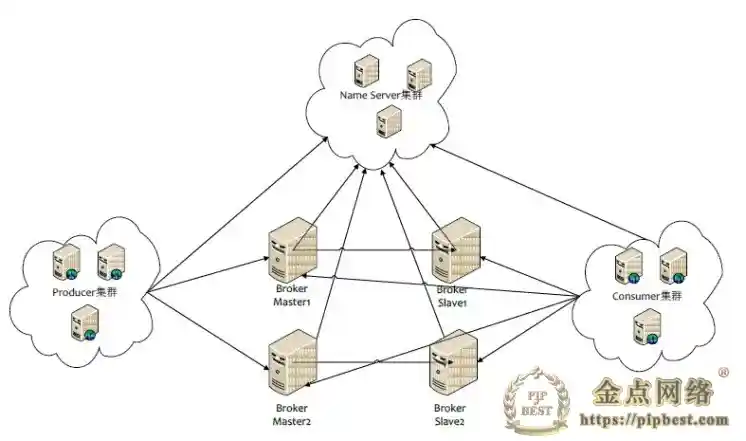
架构部署

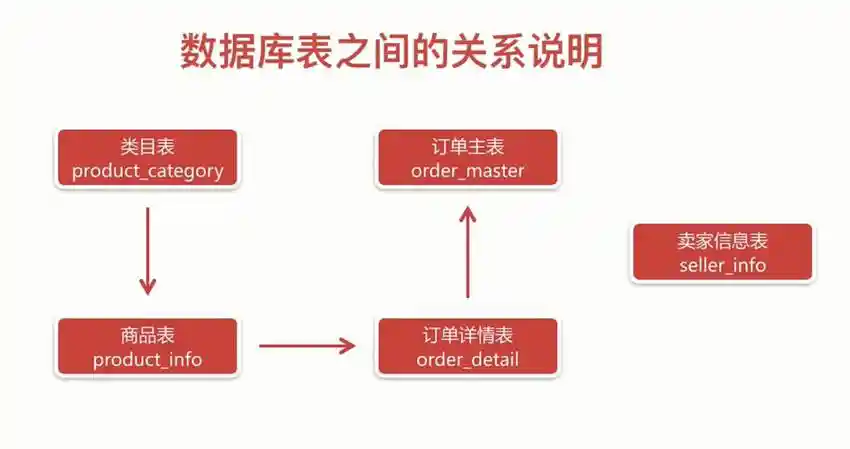
数据库设计

create table `product_info` (
  `product_id` varchar(32) not null,
  `product_name` varchar(64) not null comment '商品名称',
  `product_price` decimal(8,2) not null comment '商品单价',
  `product_stock` int not null comment '商品库存',
  `product_description` varchar(64) comment '商品描述',
  `product_icon` varchar(512) comment '商品小图',
  `product_status` int not null default 0 comment '商品状态,0正常 1下架',
  `category_type` int not null comment '类目编号',
  `create_time` timestamp not null default current_timestamp comment '创建时间',
  `update_time` timestamp not null default current_timestamp on update current_timestamp comment '修改时间',
  primary key (`product_id`)
) comment '商品表';

create table `product_category` (
  `category_id` int not null auto_increment,
  `category_name` varchar(64) not null comment '类目名称',
  `category_type` int not null comment '类目编号',
  `create_time` timestamp not null default current_timestamp comment '创建时间',
  `update_time` timestamp not null default current_timestamp on update current_timestamp comment '修改时间',
  primary key (`category_id`),
  unique key `uqe_category_type` (`category_type`)
) comment '类目表';

create table `order` (
  `order_id` varchar(32) not null,
  `buyer_name` varchar(32) not null comment '买家名字',
  `buyer_phone` varchar(32) not null comment '买家电话',
  `buyer_address` varchar(128) not null comment '买家地址',
  `buyer_openid` varchar(64) not null comment '买家微信openid',
  `order_amount` decimal(8,2) not null comment '订单金额',
  `order_status` tinyint(3) not null default '0' comment '订单状态,0新订单 1已取消 2已完结',
  `pay_status` tinyint(3) not null default '0' comment '支付状态,0待支付 1已支付',
  `create_time` timestamp not null default current_timestamp comment '创建时间',
  `update_time` timestamp not null default current_timestamp on update current_timestamp comment '修改时间',
  primary key (`order_id`),
  key `idx_buyer_openid` (`buyer_openid`)
) comment '订单主表';

create table `order_detail` (
  `detail_id` varchar(32) not null,
  `order_id` varchar(32) not null comment '订单id',
  `product_id` varchar(32) not null comment '商品id',
  `product_name` varchar(64) not null comment '商品名称',
  `product_quantity` int not null comment '商品数量',
  `product_icon` varchar(512) comment '商品小图',
  `create_time` timestamp not null default current_timestamp comment '创建时间',
  `update_time` timestamp not null default current_timestamp on update current_timestamp comment '修改时间',
  primary key (`detail_id`),
  key `idx_order_openid` (`order_id`)
) comment '订单详情表';

create table `seller_info` (
  `seller_id` varchar(32) not null,
  `username` varchar(32) not null comment '用户名',
  `password` varchar(32) not null comment '密码',
  `openid` varchar(32) not null comment '卖家openid',
  `state` tinyint(3) not null comment '账号状态,0正常 1已封禁',
  `create_time` timestamp not null default current_timestamp comment '创建时间',
  `update_time` timestamp not null default current_timestamp on update current_timestamp comment '修改时间',
  primary key (`seller_id`)
) comment '卖家信息表';

环境搭建

  • jdk
  • nginx
  • mysql
  • redis

安装 jdk

# 更新软件源
sudo apt-get update

# 安装openjdk-8-jdk
sudo apt-get install openjdk-8-jdk

# 查看java版本
java -version

openjdk 默认安装路径为 /usr/lib/jvm,然后设置环境变量:

# 打开配置文件
vi /etc/profile

# 添加下列环境变量
JAVA_HOME=/usr/lib/jvm/java-8-openjdk-amd64
JRE_HOME=$JAVA_HOME/jre
CLASSPATH=.:$JAVA_HOME/lib:$JRE_HOME/lib
PATH=$PATH:$JAVA_HOME/bin:$JRE_HOME/bin
export JAVA_HOME JRE_HOME CLASSPATH PATH

# 使环境变量生效
source /etc/profile

安装 nginx

# 安装 nginx
sudo apt-get install nginx

# 启动/停止/重启/重加载 nginx
sudo service nginx start
sudo service nginx stop
sudo service nginx restart
sudo service nginx reload

需要注意重启重加载的区别:

  • restart 重启 nginx 服务,重启会造成服务一瞬间的中断,如果配置文件出错会导致服务启动失败,那就是更长时间的服务中断。
  • reload 重新加载配置文件,nginx 服务不会中断,而且 reload 时会测试 conf 语法等,如果出错会 rollback 用上一次正确配置文件保持正常运行。

启动后访问 http://localhost/ 检测是否正常。安装完成后各个文件存放位置:

配置文件:/etc/nginx
主程序:/usr/sbin/nginx
静态文件:/usr/share/nginx
日志:/var/log/nginx

Linux 系统的配置文件一般放在 /etc,日志一般放在 /var/log,运行的程序一般放在 /usr/sbin 或者 /usr/bin

最后需要设置反代跨域:

location / {
    proxy_pass http://127.0.0.1:8080/;
    add_header Access-Control-Allow-Origin *;
    add_header Access-Control-Allow-Headers X-Requested-With;
    add_header Access-Control-Allow-Methods GET,POST,OPTIONS;
}

安装 mysql

# 安装 mysql
sudo apt-get install mysql-server

# 启动 mysql
mysql -u root -pYourNewPassword

安装完成后各个文件存放位置:

启动脚本:/etc/init.d/mysql
数据库目录:/var/lib/mysql
配置文件:/usr/share/mysql(命令及配置文件),/etc/mysql(如:my.cnf)
相关命令:/usr/bin 和 /usr/sbin

安装 redis

cd /usr/local

# 下载并解压源码
wget http://download.redis.io/releases/redis-5.0.5.tar.gz
tar xzf redis-5.0.5.tar.gz

# 编译并安装
cd redis-5.0.5
make install PREFIX=/usr/local/redis

# 复制配置文件到安装目录
mkdir /usr/local/redis/etc
cp /usr/local/redis-5.0.5/redis.conf /usr/local/redis/etc

# 启动
cd /usr/local/redis
/usr/local/redis/bin/redis-server /usr/local/redis/etc/redis.conf

# 连接 redis
/usr/local/redis/bin/redis-cli

# 关闭
/usr/local/redis/bin/redis-cli shutdown

日志 Logback

日志 = 日志门面(SLF4J) + 日志实现(Logback)。

使用方式一:

public class LoggerTest {

    private final Logger logger = LoggerFactory.getLogger(LoggerTest.class);

    @Test
    public void test() {
        logger.debug("debug...");
        logger.info("info...");
        logger.error("error...");
    }
}

使用方式二,使用 Lombok 注解:

首先引入依赖:

<dependency>
    <groupId>org.projectlombok</groupId>
    <artifactId>lombok</artifactId>
</dependency>

添加 @Slf4j 注解:

@Slf4j
public class LoggerTest {
    @Test
    public void test() {
        log.debug("debug...");
        log.info("info...");
        log.error("error...");
    }
}

日志配置方式:

  • application.yml
  • logback-spring.xml

application.yml 中进行简单配置:

logging:
  pattern:
    console: '%d - %msg%n'
  # path: C:/Users/nicestar/Documents/log
  file: C:/Users/nicestar/Documents/log/sell.log
  level: debug

但更推荐在 logback-spring.xml 中配置,可以更加细致地控制日志输出:

<?xml version="1.0" encoding="UTF-8"?>

<configuration>
    <!-- 控制台输出配置 -->
    <appender name="consoleLog" class="ch.qos.logback.core.ConsoleAppender">
        <layout class="ch.qos.logback.classic.PatternLayout">
            <pattern>%d - %msg%n</pattern>
        </layout>
    </appender>

    <!-- Info 日志文件配置 -->
    <appender name="fileInfoLog" class="ch.qos.logback.core.rolling.RollingFileAppender">
        <!-- 过滤 Error 级别日志-->
        <filter class="ch.qos.logback.classic.filter.LevelFilter">
            <level>Error</level>
            <onMatch>DENY</onMatch>
            <onMismatch>ACCEPT</onMismatch>
        </filter>
        <encoder>
            <pattern>%d - %msg%n</pattern>
        </encoder>
        <!-- 滚动策略 -->
        <rollingPolicy class="ch.qos.logback.core.rolling.TimeBasedRollingPolicy">
            <!-- 路径 -->
            <fileNamePattern>C:/Users/nicestar/Documents/log/sell/info.%d.log</fileNamePattern>
        </rollingPolicy>
    </appender>

    <!-- Error 日志文件配置 -->
    <appender name="fileErrorLog" class="ch.qos.logback.core.rolling.RollingFileAppender">
        <!-- 过滤 Info 级别日志-->
        <filter class="ch.qos.logback.classic.filter.ThresholdFilter">
            <level>Error</level>
        </filter>
        <encoder>
            <pattern>%d - %msg%n</pattern>
        </encoder>
        <rollingPolicy class="ch.qos.logback.core.rolling.TimeBasedRollingPolicy">
            <fileNamePattern>C:/Users/nicestar/Documents/log/sell/error.%d.log</fileNamePattern>
        </rollingPolicy>
    </appender>

    <!-- 将上述配置引入并控制日志级别 -->
    <root level="info">
        <appender-ref ref="consoleLog" />
        <appender-ref ref="fileInfoLog" />
        <appender-ref ref="fileErrorLog" />
    </root>
</configuration>

数据库与缓存

引入依赖:

<dependency>
    <groupId>mysql</groupId>
    <artifactId>mysql-connector-java</artifactId>
</dependency>
<dependency>
    <groupId>org.springframework.boot</groupId>
    <artifactId>spring-boot-starter-data-jpa</artifactId>
</dependency>
<dependency>
    <groupId>org.springframework.boot</groupId>
    <artifactId>spring-boot-starter-data-redis</artifactId>
</dependency>

配置 application.yml

spring:
  datasource:
    driver-class-name: com.mysql.cj.jdbc.Driver
    username: root
    password: 1124nicestar
    url: jdbc:mysql://127.0.0.1:3306/sell?characterEncoding=utf-8&useSSL=false&serverTimezone=UTC
  jpa:
    show-sql: true
  redis:
    host: 127.0.0.1
    port: 6379

打包部署

打包项目:

mvn clean package -Dmaven.test.skip=true

上传远程服务器:

scp -P 8022 target/sell.jar root@127.0.0.1:/opt/javaapps

启动:

cd /opt/javaapps
java -jar sell.jar

# 指定端口和环境
java -jar -Dserver.port=8090 -Dspring.profiles.active=prod sell.jar

# 后台运行
nohup java -jar -Dspring.profiles.active=prod sell.jar > /dev/null 2>&1 &
# 查看进行
ps -ef |grep sell.jar
# 杀死进程
kill -9 1700

Error

001 Table ‘sell.hibernate_sequence’ doesn’t exist. could not read a hi value.

将主键生成策略修改为:

/* 类目 id */
@Id
@GeneratedValue(strategy = GenerationType.IDENTITY)
private Integer categoryId;

002 No default constructor for entity

进行列表查询,需要给 dataobject 添加无参的构造方法:

/* 列表查询时需要增加一个默认的构造器 */
public ProductCategory() {}

003 Could not autowire. No beans of ‘ProductInfoServiceImpl’ type found.

忘记给 service 实现类添加 @Service 注解。

@Service
public class ProductCategoryServiceImpl implements ProductCategoryService {}

004 Error creating bean with name ‘entityManagerFactory’ defined in class path resource.

没有给 dataobject 主键添加 @Id 注解:

@Id
private String productId;

005 No validator could be found for constraint ‘javax.validation.constraints.NotEmpty’ validating type ‘java.lang.Integer’.

对于 Integer、Long 类型的属性值,表单验证用的注解应该是用 @NotNull,不能用 @NotBlank 或者 @NotEmpty

@Data
public class CategoryForm {

    @ApiModelProperty("类目名称")
    @NotEmpty(message = "类目名称必填")
    private String categoryName;

    @ApiModelProperty("类目编号")
    @NotNull(message = "类目编号必填")
    private Integer categoryType;
}
本站所提供的部分资源来自于网络,版权争议与本站无关,版权归原创者所有!仅限用于学习和研究目的,不得将上述内容资源用于商业或者非法用途,否则,一切后果请用户自负。您必须在下载后的24个小时之内,从您的电脑中彻底删除上述内容资源。如果上述内容资对您的版权或者利益造成损害,请提供相应的资质证明,我们将于3个工作日内予以删除。本站不保证所提供下载的资源的准确性、安全性和完整性,源码仅供下载学习之用!如用于商业或者非法用途,与本站无关,一切后果请用户自负!本站也不承担用户因使用这些下载资源对自己和他人造成任何形式的损失或伤害。如有侵权、不妥之处,请联系站长以便删除!
金点网络 » 项目实践·微信点餐系统

常见问题FAQ

免费下载或者VIP会员专享资源能否直接商用?
本站所有资源版权均属于原作者所有,这里所提供资源均只能用于参考学习用,请勿直接商用。若由于商用引起版权纠纷,一切责任均由使用者承担。
是否提供免费更新服务?
持续更新,永久免费
是否经过安全检测?
安全无毒,放心食用

提供最优质的资源集合

立即加入 友好社区
×